Next13 + typescript + styled-components( theme, GlobalStyle ) + storybook 세팅하기
최근 사이드 프로젝트로 농구장 대관 서비스 BIG ( Basketball Indoor Gym )
을 열심히 하고 있다.
프론트의 기술 스택은 리액트를 선택하였고, 한 6개월 정도만에 어느정도 화면단이 다 구성이 되었었다.
다만 이때 개발을 할때, 초기 기획과 디자인이 제대로 결정이 나지 않은 상태여서 개발을 진행 하였었다. 또한 디자인 패턴 또한 정하지 않고 개발을 진행하였었다. 그러다보니 코드의 가독성이 떨어지고, 뭔가 작업을 하려고 하면 힘이 빠지는 느낌이 들었다.. 🥲
그래서 이번에 전부 다 갈아엎고 디자인을 먼저 완성 시킨 후 Next.js 로 새롭게 개발을 하려고 마음을 먹었다!
이번에는 아토믹 디자인 패턴에 맞게 개발을 진행하려고 한다.
아토믹 디자인 패턴은 컴포넌트의 재사용성을 극대화 시킨 디자인 패턴으로
쉽게 말하면 작은 단위부터, 컴포넌트로 만들어서 모든 것을 컴포넌트로 만드는 방식이다. ( 내가 이해한 바로는 그렇다 )
아토믹디자인 관련해서 참고한 사이트이다.
https://fe-developers.kakaoent.com/2022/220505-how-page-part-use-atomic-design-system/
또한 아토믹 디자인 패턴에 스토리북을 도입하면 정말 유용하고 깔끔하게 작업이 될 것 같아서 스토리북도 도입을 하였다.
그래서
Next13 + typescript + styled-components + storybook
해당 기술 스택 및 라이브러리를 이용하여 현재 일부 컴포넌트들을 스토리북으로 볼 수 있게 작업을 해놓은 상태이고,
이 과정을 기록해보려 한다.
Next.js 는 create-next-app 으로 만들었으며,
npx create-next-app@latest내 경우의 버젼은 "13.4.13" 이다.
그리고 스토리북을 세팅하였다. 스토리북 Next.js 세팅을 공식문서에 친절하게 나와있었다.
https://storybook.js.org/recipes/next
Integrate Next.js with Storybook | Storybook
Next.js enables you to create full-stack web applications by extending the latest React features
storybook.js.org
그대로 하였고, 그다음 styled-components 를 설치 후 스토리북에 적용하였다.
스토리북에 적용하기 위해서는 stroybook plugin을 설치하여야 했다. 설치 후 스토리북 관련 설정 파일은 아래와 같다.
// .storybook/main.ts

import type { StorybookConfig } from '@storybook/nextjs';

const config: StorybookConfig = {
  stories: [
    '../components/**/*.mdx',
    '../components/**/*.stories.@(js|jsx|mjs|ts|tsx)',
  ],
  addons: [
    '@storybook/addon-links',
    '@storybook/addon-essentials',
    '@storybook/addon-onboarding',
    '@storybook/addon-interactions',
    '@storybook/addon-styling',
  ],
  framework: {
    name: '@storybook/nextjs',
    options: {},
  },
  docs: {
    autodocs: 'tag',
  },
  staticDirs: ['../public'],
};
export default config;
// .storybook/preview.ts
import type { Preview } from '@storybook/react';
import { withThemeFromJSXProvider } from '@storybook/addon-styling';
import GlobalStyles from '../styles';
import { theme } from '../styles/theme';
import { ThemeProvider } from 'styled-components';
const preview: Preview = {
parameters: {
actions: { argTypesRegex: '^on[A-Z].*' },
controls: {
matchers: {
color: /(background|color)$/i,
date: /Date$/,
},
},
},
};
export const decorators = [
withThemeFromJSXProvider({
GlobalStyles,
themes: { default: theme },
defaultTheme: 'default',
Provider: ThemeProvider,
}),
];
export default preview;
스토리북 설정 파일은 이렇게 두개가 끝이고,
next.js 에 ThemeProvider 와 GlobalStyle 을 적용하면 아래와 같다.
나의 경우 구글링 중 Providers 컴포넌트를 하나 만들어서 사용하면 편하다는 것을 발견해서 아래와 같이 처리를 하였고, 이게 일반적으로 쓰이고 있는 방법인지는 잘 모르겠다.
// app/providers.tsx -> 직접 생성한 파일

'use client';

import { PropsWithChildren } from 'react';
import GlobalStyle from '@/styles';
import { theme } from '@/styles/theme';

import { ThemeProvider } from 'styled-components';

import '@/styles/fonts.css';

export function Providers({ children }: PropsWithChildren) {
  return (
    <ThemeProvider theme={theme}>
      <GlobalStyle />
      {children}
    </ThemeProvider>
  );
}
그런 다음 layout.tsx 의 children 을 위의 Providers 컴포넌트로 감싸주면 된다.
// app/layout.tsx

import type { Metadata } from 'next';
import StyledJsxRegistry from './registry';
import { Providers } from './providers';

export const metadata: Metadata = {
  title: 'Create Next App',
  description: 'Generated by create next app',
};

export default function RootLayout({
  children,
}: {
  children: React.ReactNode;
}) {
  return (
    <html lang="en">
      <body>
        <StyledJsxRegistry>
          <Providers>{children}</Providers>
        </StyledJsxRegistry>
      </body>
    </html>
  );
}
이렇게 하면 세팅은 끝이고
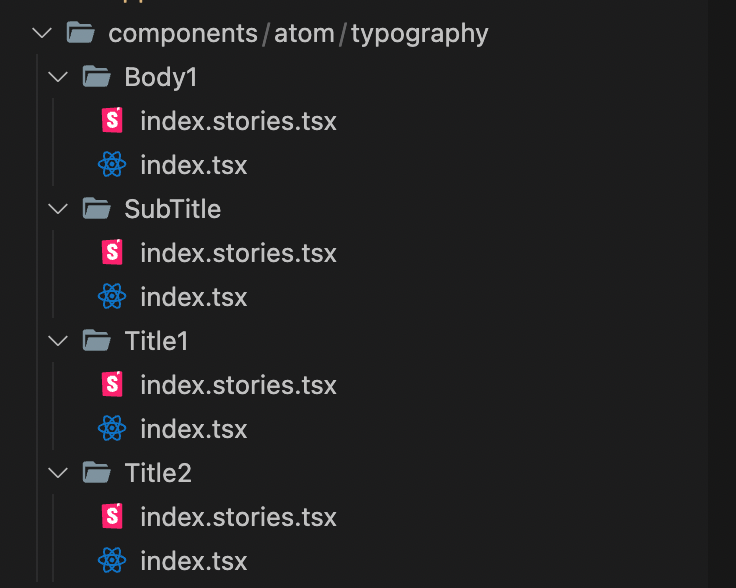
이제 아토믹 디자인 패턴을 적용하여서 일부 typography 컴포넌트를 만들어 보았다. 디렉토리 구조는 아래와 같이 만들었다.

스토리북 실행 화면이다. 굉장히 깔끔해서,, 개인적으로 마음에 든다.

피그마를 작업할때 컴포넌트별로 모두 나누어 놨기 때문에
이제는 컴포넌트 단위로 쭉쭉 개발할일만 남았다.